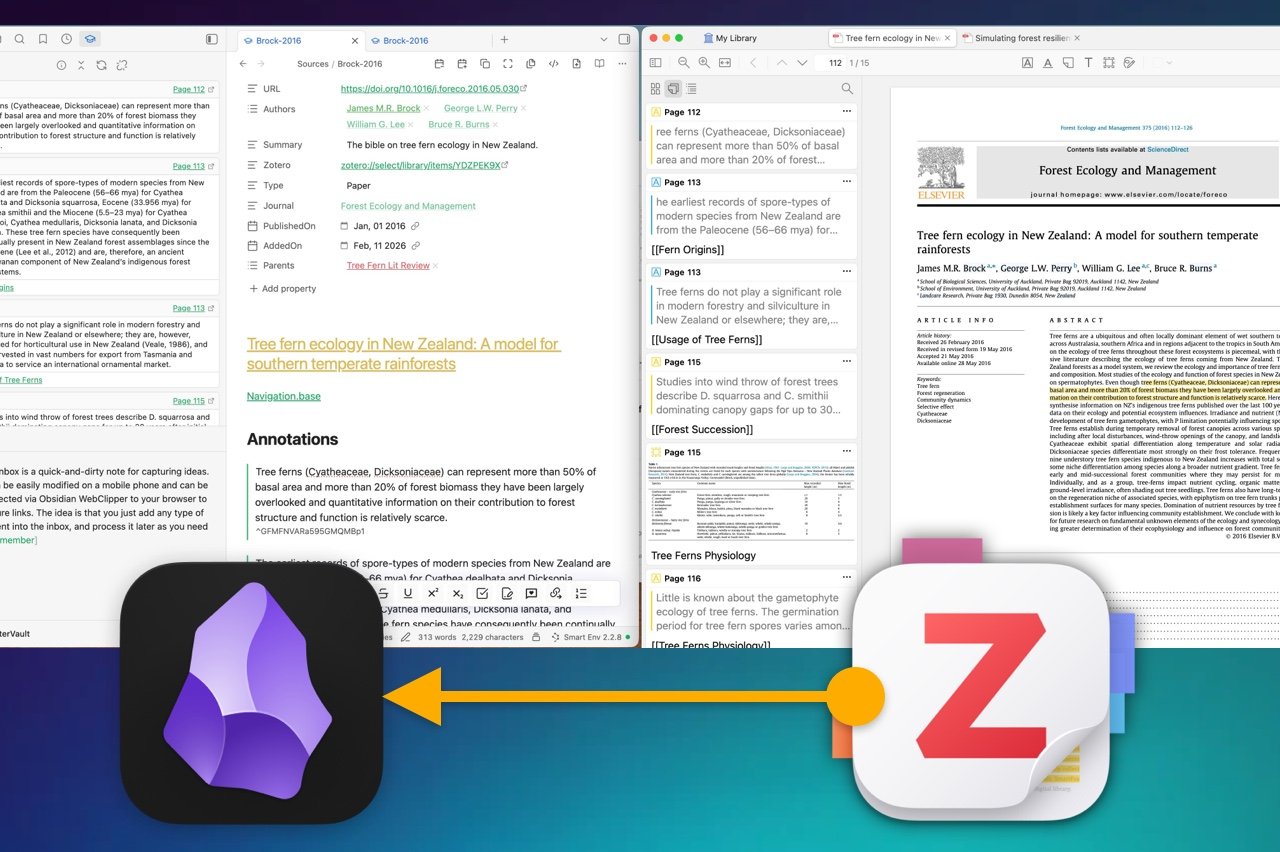
Zotero is the most commonly used reference manager in the world. Obsidian is on its way to becoming the most commonly used academic note-taking tool, due to its open, free, and private nature. In this article, I want show you the best way to connect them together.
Learn the foundational systems researchers are rarely taught: from powerful note-taking and knowledge management methods to modern lit review tools, ethical AI and productive research workflows.
Before we get into the technical details, think about your motivation for a second. What makes
Why connect Zotero to Obsidian?
Zotero’s strengths are PDF annotation, extracting metadata such as authors or abstracts, organising your PDFs in folders, and a sizeable collection of community plugins. Obsidian, on the other hand, a note-taking tool, consists primarily of your own ideas, which build on the PDFs. Combining the two will therefore help you synthesise the information you have read and find it easier. Here is how easy it is once it is setup:
On the left is Obsidian, on the right is Zotero, with a paper open and a few annotations already made. Notations include images as well as comments. With one click, I can import all of that into a format compatible with my academic note-taking system. Convinced? Let’s dive in.

The ZotLit plugin
This plugin is one of the best ways to integrate Obsidian with Zotero, even though the “Zotero Integration” is a more popular plugin (primarily due to its age). The reason why:
- It allows you to bulk export your papers from Zotero to Obsidian, as it has a dedicated Zotero extension.
- The templating language is incredibly powerful and allows for intricate customisations.
- It accesses Zotero’s database directly, making it blazingly fast.
- Zotlets can pull metadata, annotations, and image highlights from Zotero.
Currently, the main disadvantage is bugs. For instance, using Zotero 8 can lead to problems. However, the newer versions of Zotero 9 and 10 are officially supported by the latest Zotlit v2.
To install the plug-in, simply go to settings, community plug-ins, and search for Zotlit:

Sometimes it is necessary to update your Obsidian version and the so-called installer. The easiest way to do both in one swoop is to download and re-download Obsidian from the website, then replace the main application file with the new one. Your settings and vaults will not be affected by this. If you skip this step, Zotlit might fail to install or display a few errors, as happened to this gentleman in the Effortless Academic community.

Just remember to update Obsidian before installing, and you should not run into any problems.
Setting up Zotlit
While this process is a little bit involved, let’s go step by step and remember you only have to do it once.
⚠️ ZotLit received a major rewrite in August 2026 with the release of ZotLit v2. The new version fixes many of the compatibility problems that affected v1, supports Zotero 9 and 10, and introduces a new ZotLit Companion add-on for Zotero, as well as a new template system. This tutorial applies specifically to ZotLit v1. If you are setting ZotLit up from scratch, follow the current v2 documentation.
Step 1: Connecting Zotero to Zotlit
Make sure Better BibTeX, a popular Zotero plugin, is installed in Zotero before continuing. The first step is to go to your settings (to Zotero settings), click on the Advanced tab, and note the “data directory location”. Then go to the settings in Obsidian. Click on Zotlit. Select the Connect tab and specify that same folder under the Zotero data directory.

The result should be some green string signifying that the connection was successful.
Step 2: Specify where ZotLit will import literature notes
Next, navigate to settings (Zotlit general) and set up the folders where Zotlit will import the literature notes and any image highlights:

There is no right or wrong answer to where you want to import things. My suggestion is to have a dedicated folder for all your literature notes here called “Sources” and store the images somewhere else (e.g. in an attachments folder), so they don’t mix.
Importantly, set the image excerpt setting to “copy”, as this will copy the images rather than link to Zotero.
Step 3: Literature Note Name and File Templates
We’re almost ready. The next step is to tell Zotlit how your file will be called. This is typically done by specifying a number of properties that may or may not exist on a paper. Here is my template:
<%= it.citekey ?? it.title ?? it.key %>.md
While cryptic, what it says is: Use the citation key provided by BetterBibTex in the Zotero settings, if it is not available → use the title of the paper, and if this is not available → use the internal Zotero key (which is always available). I typically configure the citation key to be the first author and year: “Smith-2020”. You can easily set it up in the better BibTeX setting by providing auth+"-"+ year in the Citation Key Formula field.

After you have configured the file name, you are ready to import! However, you will likely want to customise the content of the imported literature notes. Hit the eject button to have Zotlit save all templates to a folder, making them easily editable. The templates are called `zt-note.eta`, for example.
Step 4: Zotero Obsidian Integration Templates
Zotlit uses the ETA templating language under the hood. It would be beyond the scope of this article to show you every detail, so please refer to the documentation instead, where needed. Moreover, Zotlit breaks the template into a few elements, making it a bit harder to understand which goes where. Let’s break down the six template snippets that Zotlit has created and what they mean.
The important thing to remember is that this template is a type of code highlighted by the `<%= …%>` blocks. Inside these blocks, you access different parts of the information Zotero provides. For example, “it.title” will be replaced with the title of the paper and “it.date” the publication date. A full list can be found in the zotlit cheatsheet.
The first template part is called zt-note.eta, this is the template for the literature note itself. Using `<%= it.title %>` you can add the title of the paper. Make sure to include the line <%~ include("annots", it.annotations) %> to include all your annotations as well. This will be included by default:

Any other text you add here will appear in the note. For example, I used an “Annotations” header to delineate the annotations from my summary, which goes right under the title.
Next, you can configure how these annotations will be displayed using the zt-annots.eta and zt-annot.eta (just without the ‘s’) templates. zt-annots simply loops over all possible annotations and inserts them, while zt-annot defines how every single annotation will look.

zt-annots.eta likely does not need to be changed, unless you want to add complex logic, like sorting your annotations by color. In my case, I configured the zt-annot.eta template to print out my comment on the paper annotation as well.
The final step is to extract the metadata from Zotero, which will be stored in the properties of your note. This allows you to later use Obsidian bases to manage your papers, for instance. The template for this is called zt-field.eta:

In my case I extract the following properties:
- Title of the paper
- A URL, which is automatically built from the DOI that zotero provides. This field is skipped if no DOI is provided.
- A list of authors as links. Linking the author later allows to identify papers written by a specific author.
- Summary, which is initially just “Unread”, I fill it out after reading.
- A “Type: Paper”, which is something that I use to manage my vault (see how to use Bases for organisation).
- A Journal field, if Zotero provides it.
- The publication date to sort papers by year later.
Using just this minimal set of properties will let you almost replace Zotero for managing your PDFs. (That’s exactly what I think you should do!)
The ZotLit Annotation View Side Panel
Regardless of whether you are importing literature notes or not, Zotlit allows you to view all Zotero annotations within Obsidian and drag and drop them into your current note. To do this, you need to press “Ctrl/Cmd+P” and then type in “Zotlit: Open Zotero annotation view in side panel”. This will open the Zotero, the Zotlit side panel. To choose which paper’s annotations will appear in the side panel, you need to click the link button and select the paper from the pop-up. Here is how it looks:
Notice the drag-and-drop of the annotations. To customise what appears when you drag and drop the annotation, you need to customise the zt_annot.eta template.
What Data can be imported from Zotero to Obsidian?
Zotlit provides a special preview of all data that you can import into a literature note, and for each annotation. After opening the side panel, as described in the previous section, click on the (i) button next to open a window with three tabs.
- Left is the annotation template (zt-annot.eta)
- Middle is an example result after using the template on the annotation.
- Right is a list of all available data
Now look at what looks useful in the available data tab (right). Right-click any item and select “copy”. Then paste that into the left tab (the template) and see the preview in the middle tab change immediately. After you close this view, the template is updated. In this demo, we will add a link back to the tarot and a page number to our annotation.
This approach makes it unnecessary to look at any technical documentation, and you can trial-and-error your way into customising these templates.
Is it better to store PDFs in Obsidian or in Zotero?
Apply the “single source of truth principle” to answer this question: All information that is connected should live under one roof. If all your notes are in Obsidian, why should you store the PDFs that are linked to these notes in Zotero? Storing them in Obsidian is a no-brainer, especially since you can link directly to annotations inside PDFs, which greatly enhances the value of your notes.

The above image is an example of a deep link, and in my opinion, I must have it for academic information management.
How to use Zotero with Obsidian
The most effective way, is to import literature notes from Zotero to Obsidian, including annotations. Then, as you write your notes and understand the subject matter, link to the various annotations that you had made in Zotero. Obsidian allows you to link to blocks (i.e. annotations). If you install the Copy Block Link plugin, you can right-click any block and copy its link.

Normally, we are used to commenting on highlights we made in papers – our words are secondary. I think this is wrong. You should write what you understand in your own words first, and use the highlights as comments or back-up to your words. This puts your worst first and legitimates what you write into your notes, making it trackable to the source paper.
👉 This workflow is certainly slightly complicated. If you’re interested, I have recorded a full course on how it works in detail and also how to organise your notes such that you create ideas on autopilot and never forget what you read.
Summary
We have imported the Zotero annotations into Obsidian using the Zotlit plugin. The plugin is highly customizable and provides an overview of the data that comes from Zotero, making it easy to customise even if you don’t know the templating language behind Zotlit. Additionally, Zotlit allows you to copy single annotations from PDFs directly into Obsidian using drag-and-drop. Well, the plugin is far from perfect and has quite a few bugs here and there. It is one of the most useful plugins for academics. If you want to go deeper into this topic, try the note-taking course.


